Project Car
Project: Diagnosing a Fuel Delivery Issue
After finishing up the timing belt replacement, I found that the car wouldn't turn over. The car would crank just fine but wouldn't catch.
There are three things that are required for an engine to run: fuel, air, and spark. The first of these three that I chose to look into was, as you probably guessed, fuel!
Right off the bat it was pretty clear that there was an issue with the fuel delivery. Despite having cranked the car several times and for quite some time, I could easily look down the choke and see that the carburetor was dry. Since I didn't know how much gas was left in the tank, the first thing I did was add a couple of gallons of fresh gas. That didn't fix it, so it seemed like there was actually something to fix.
I had never diagnosed an automotive issue before, but I have quite a bit of experience fixing bugs in software. When I'm fixing code, the first thing I usually try to do it determine the point of failure: where is something working differently than I expect it to. In code, this is often much more difficult than it sounds, but the fuel system for this car is pretty simple, so I thought a straightforward approach should work.
The fuel system is composed of a few parts, all of which are also pretty simple. There's the fuel tank (which I knew had gas in it), a fuel line that runs up the body of the car, a mechanical fuel pump that's driven by the auxilary shaft, some more fuel lines, a fuel filter, and finally the carburetor. I knew there was fuel in the tank, so my plan was to start at the carburetor side and work backwards until I found an issue.
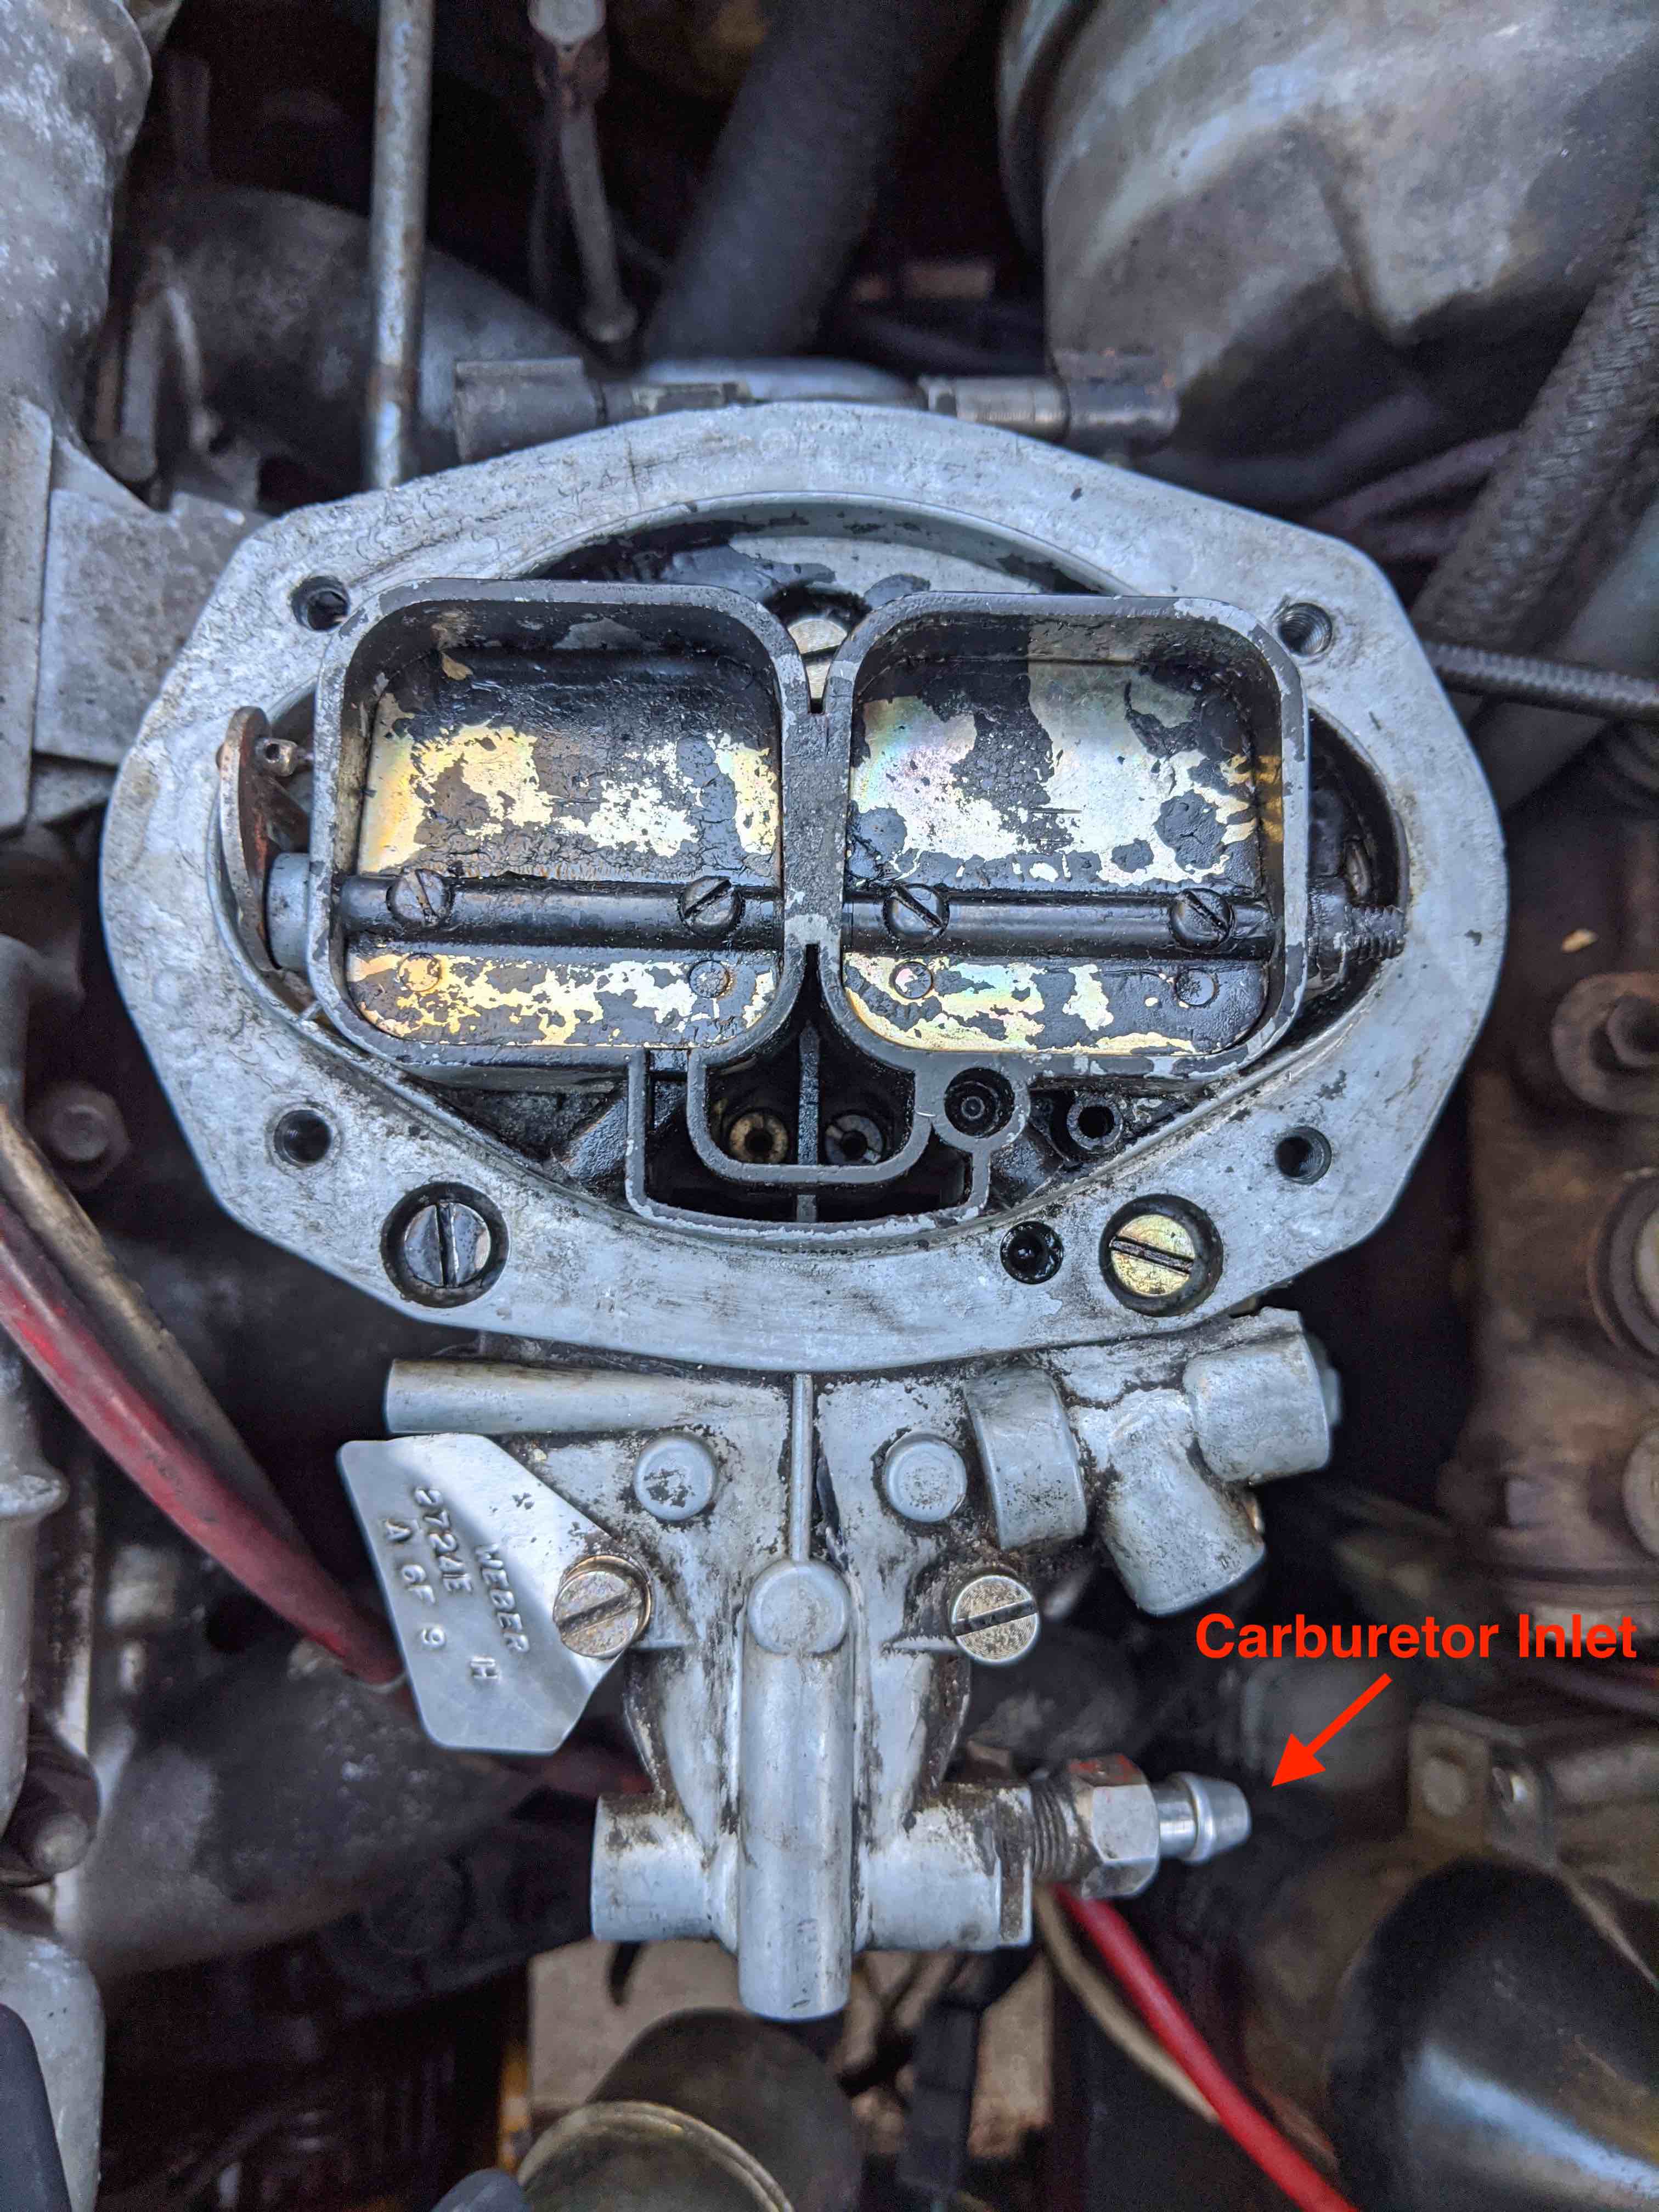
I started by disconnecting the fuel line that goes into the carburetor inlet. We had determnined that there wasn't any fuel in the carburetor, and since I wanted to avoid taking apart the carburetor unnecessarily, I went to the fuel line. I stuck the fuel line in a bottle and cranked the car. Upon doing so, I found that there wasn't any fuel coming through the line.
With no fuel going into the carburetor, the next thing to check were the fuel lines and fuel filter. I removed the line coming off the fuel pump as well as the fuel filter. Using a small handheld water pump, I tried pumping distilled water through the lines and filter. The water pumped through without issue. This confirmed that the lines weren't blocked and the filter wasn't clogged.
Before I moved on to taking off the fuel pump, I tested the fuel pump with it still mounted on the car. I first disconnected the inlet of the fuel pump and plugged up the fuel line that ran to it. I then attached a different hose to the inlet and fed it to some distilled water. If the fuel pump was working, it would pump the distilled water, which would confirm that the pump worked and that there was a clog between the pump and the fuel tank.
When I cranked the car, I didn't get any distilled water through the pump. To double-check, I removed the hose to the distilled water and put a gloved finger over the inlet when having someone crank the car. There wasn't any sort of suction at the inlet, which further confirmed that there was something wrong with the pump. Either that, or the auxilary shaft wasn't actuating the pump arm.
I then removed the pump so I could check it out. It's actually pretty difficult to remove. There are two 13mm bolts that hold the fuel pump to the crankcase. The front one is easy to remove. The one in the back is very difficult to remove. When taking it off, make sure to remove the spacer and gaskets as well. The gaskets should be replaced on reinstallation.
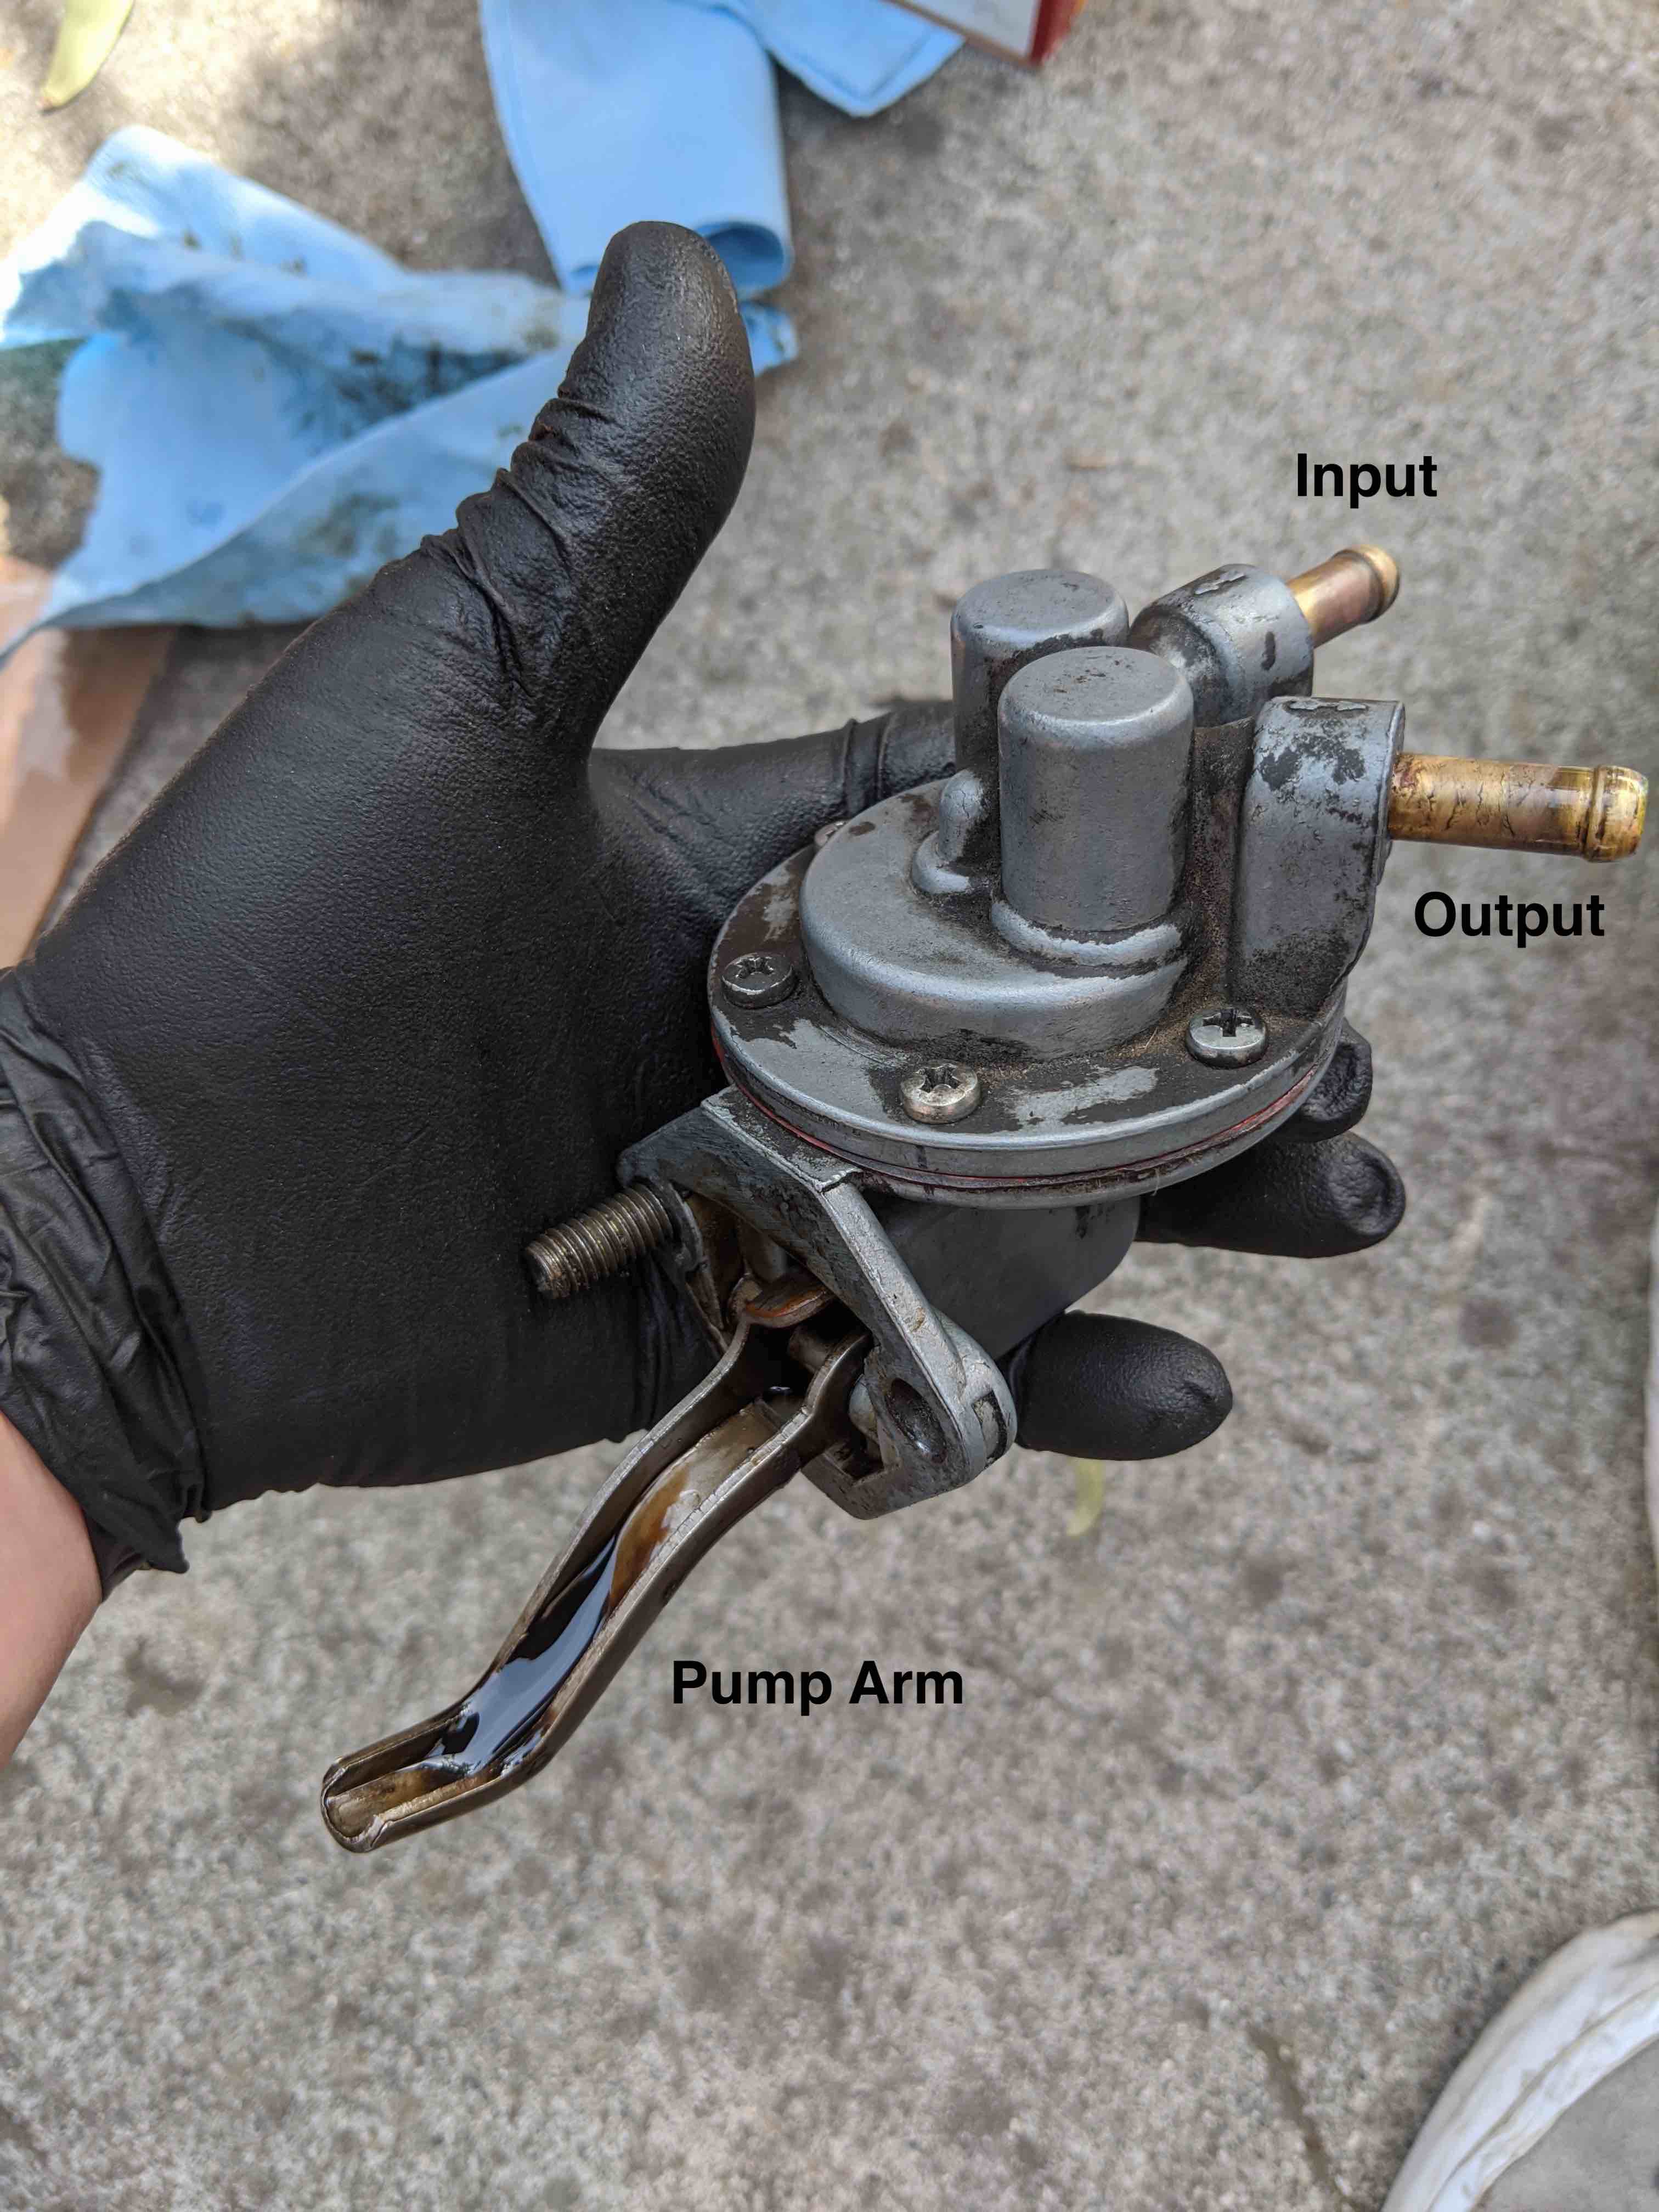
With the fuel pump extracted, I did a final test to make sure I had to diagnose an issue within it. To test it, I pumped the arm by hand and checked for suction at the inlet. There wasn't any suction at all, so I figured there must be something wrong within it.
I don't have any pictures of it taken apart, unfortunately. I recently picked up a s spare though, so I might take that one apart for some pictures.
Before dismantling, I marked the two halves of the fuel pump. There are multiple orientations of the two halves that are possible, so marking how they line up helped me to be able to replace the halves confidently.
The fuel pump that I have has six bolts on it that hold it together. After removing these bolts, the two halves come apart quite easily. I first inspected the diaphragm for cracking or damage. I found none at all. I was also able to pump the lever with it open and found that the diaphragm was providing suction, though not to the inlet.
I then removed the filters and valves. Fortunately, on the pump that I have, the valves can be removed without breaking them. On the OEM pumps, the valves need to be pryed out, which breaks them. For mine, there are two bolts that hold on a valve plate. Once removed, the filters and valves can be lifted out.
I inspected the filters and they seemed fine. I inspected the valves and they were stuck closed! There was some dried residue that was keeping them stuck in their closed position. I rinsed them with some distilled water to remove some of the crud and then poked the valve open to dislodge the rest of the residue. My assumption is that some of the ~20 year old gas left in the tank evaporated and left it behind, sealing the valve.
I put everything back into the fuel pump and joined the two halves back together (using the marks to confirm alignment). Once back together, I manually tested the fuel pump by pumping the lever by hand. This time, there was suction at the input! I tested it again by leading the input into some distilled water and found that I was able to pump water through the fuel pump now!
With the fuel pump unclogged, I reinstalled it, hooked all the fuel lines back up to connect it with the carburetor, and tried cranking the car again. It. Still. Didn't. Work.
I did the same procedure this time around. I had confirmed that the fuel pump was working independent of the system, but for some reason there were still issues. Peeking through the choke again, I saw once again that the carb was dry. This was somewhat of a relief, since if the fuel was being delivered and the car wasn't starting, there would be a completely different issue to solve.
Starting at the carb inlet, I detached the fuel line again. My plan was to work backwards once again to determine where the fuel was dropping off. This time, there was fuel right at the inlet. This meant that I would have to check out what was going on inside the carb to continue.
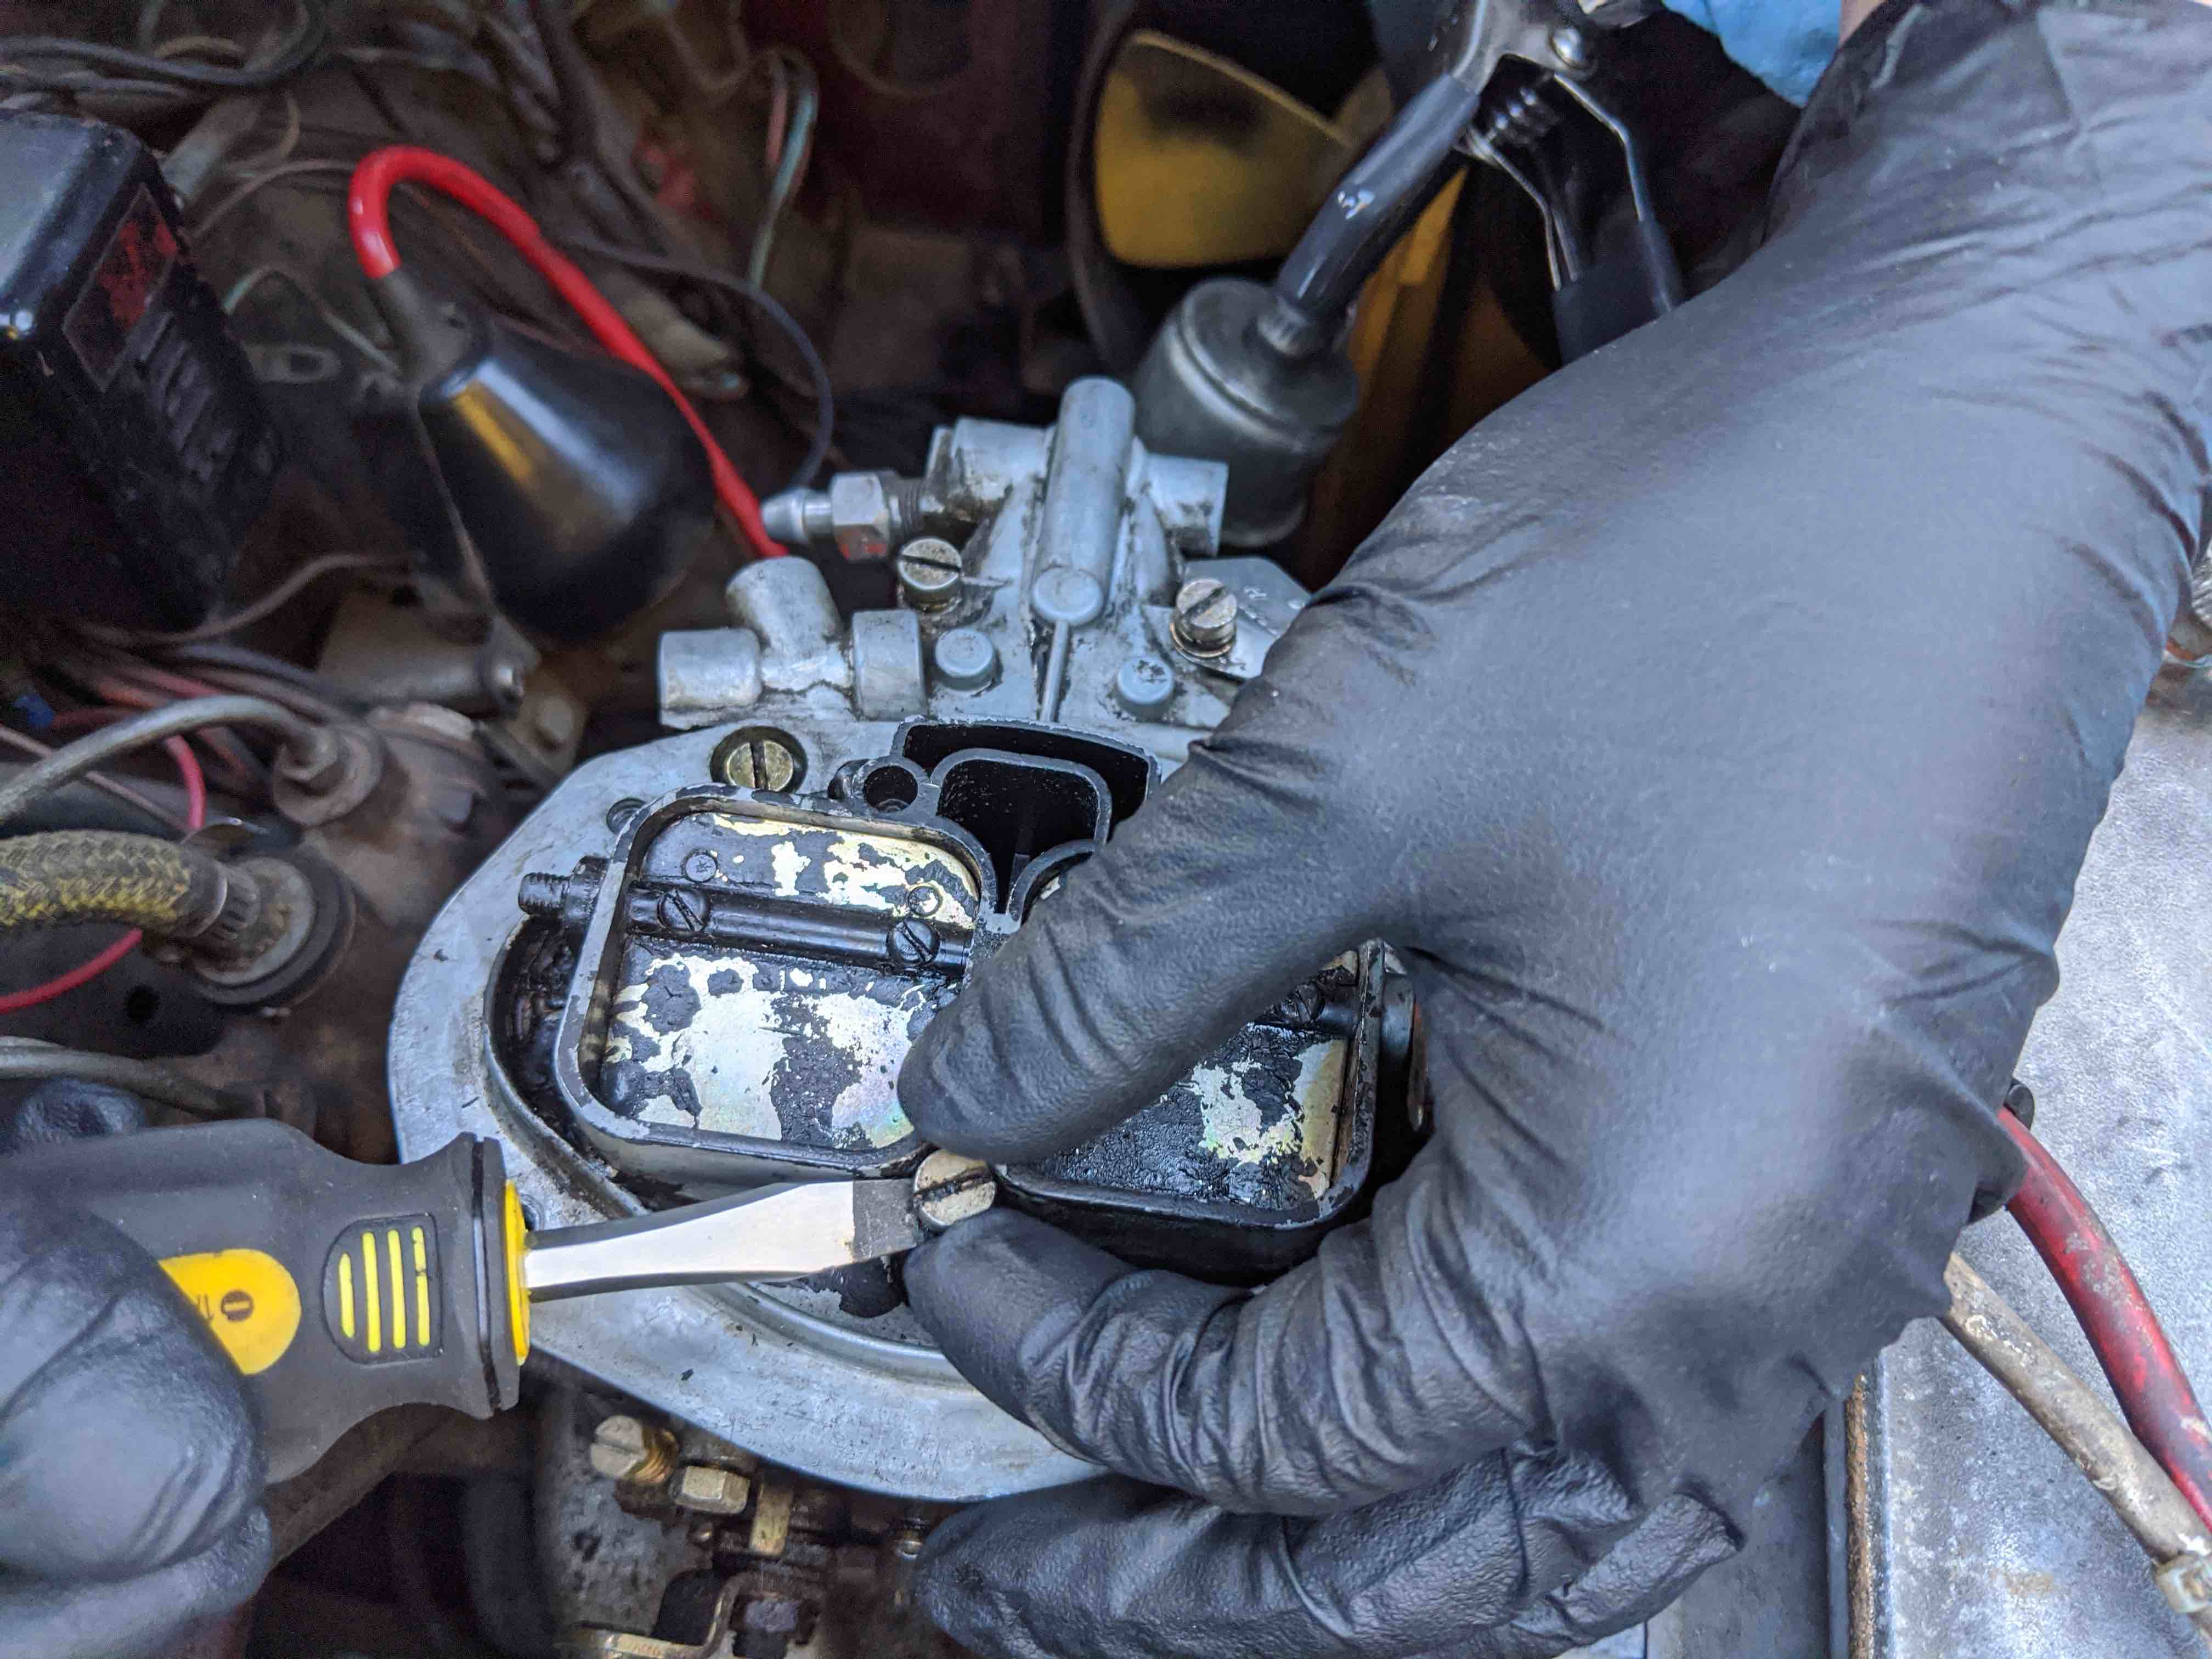
I first removed the top of the carburetor. There's a small pin that holds on the choke actuating arm. This arm is fed through a hole in the top half of the carb, so it needs to be free for the top to come off. I then removed all the bolts holding the top half on.
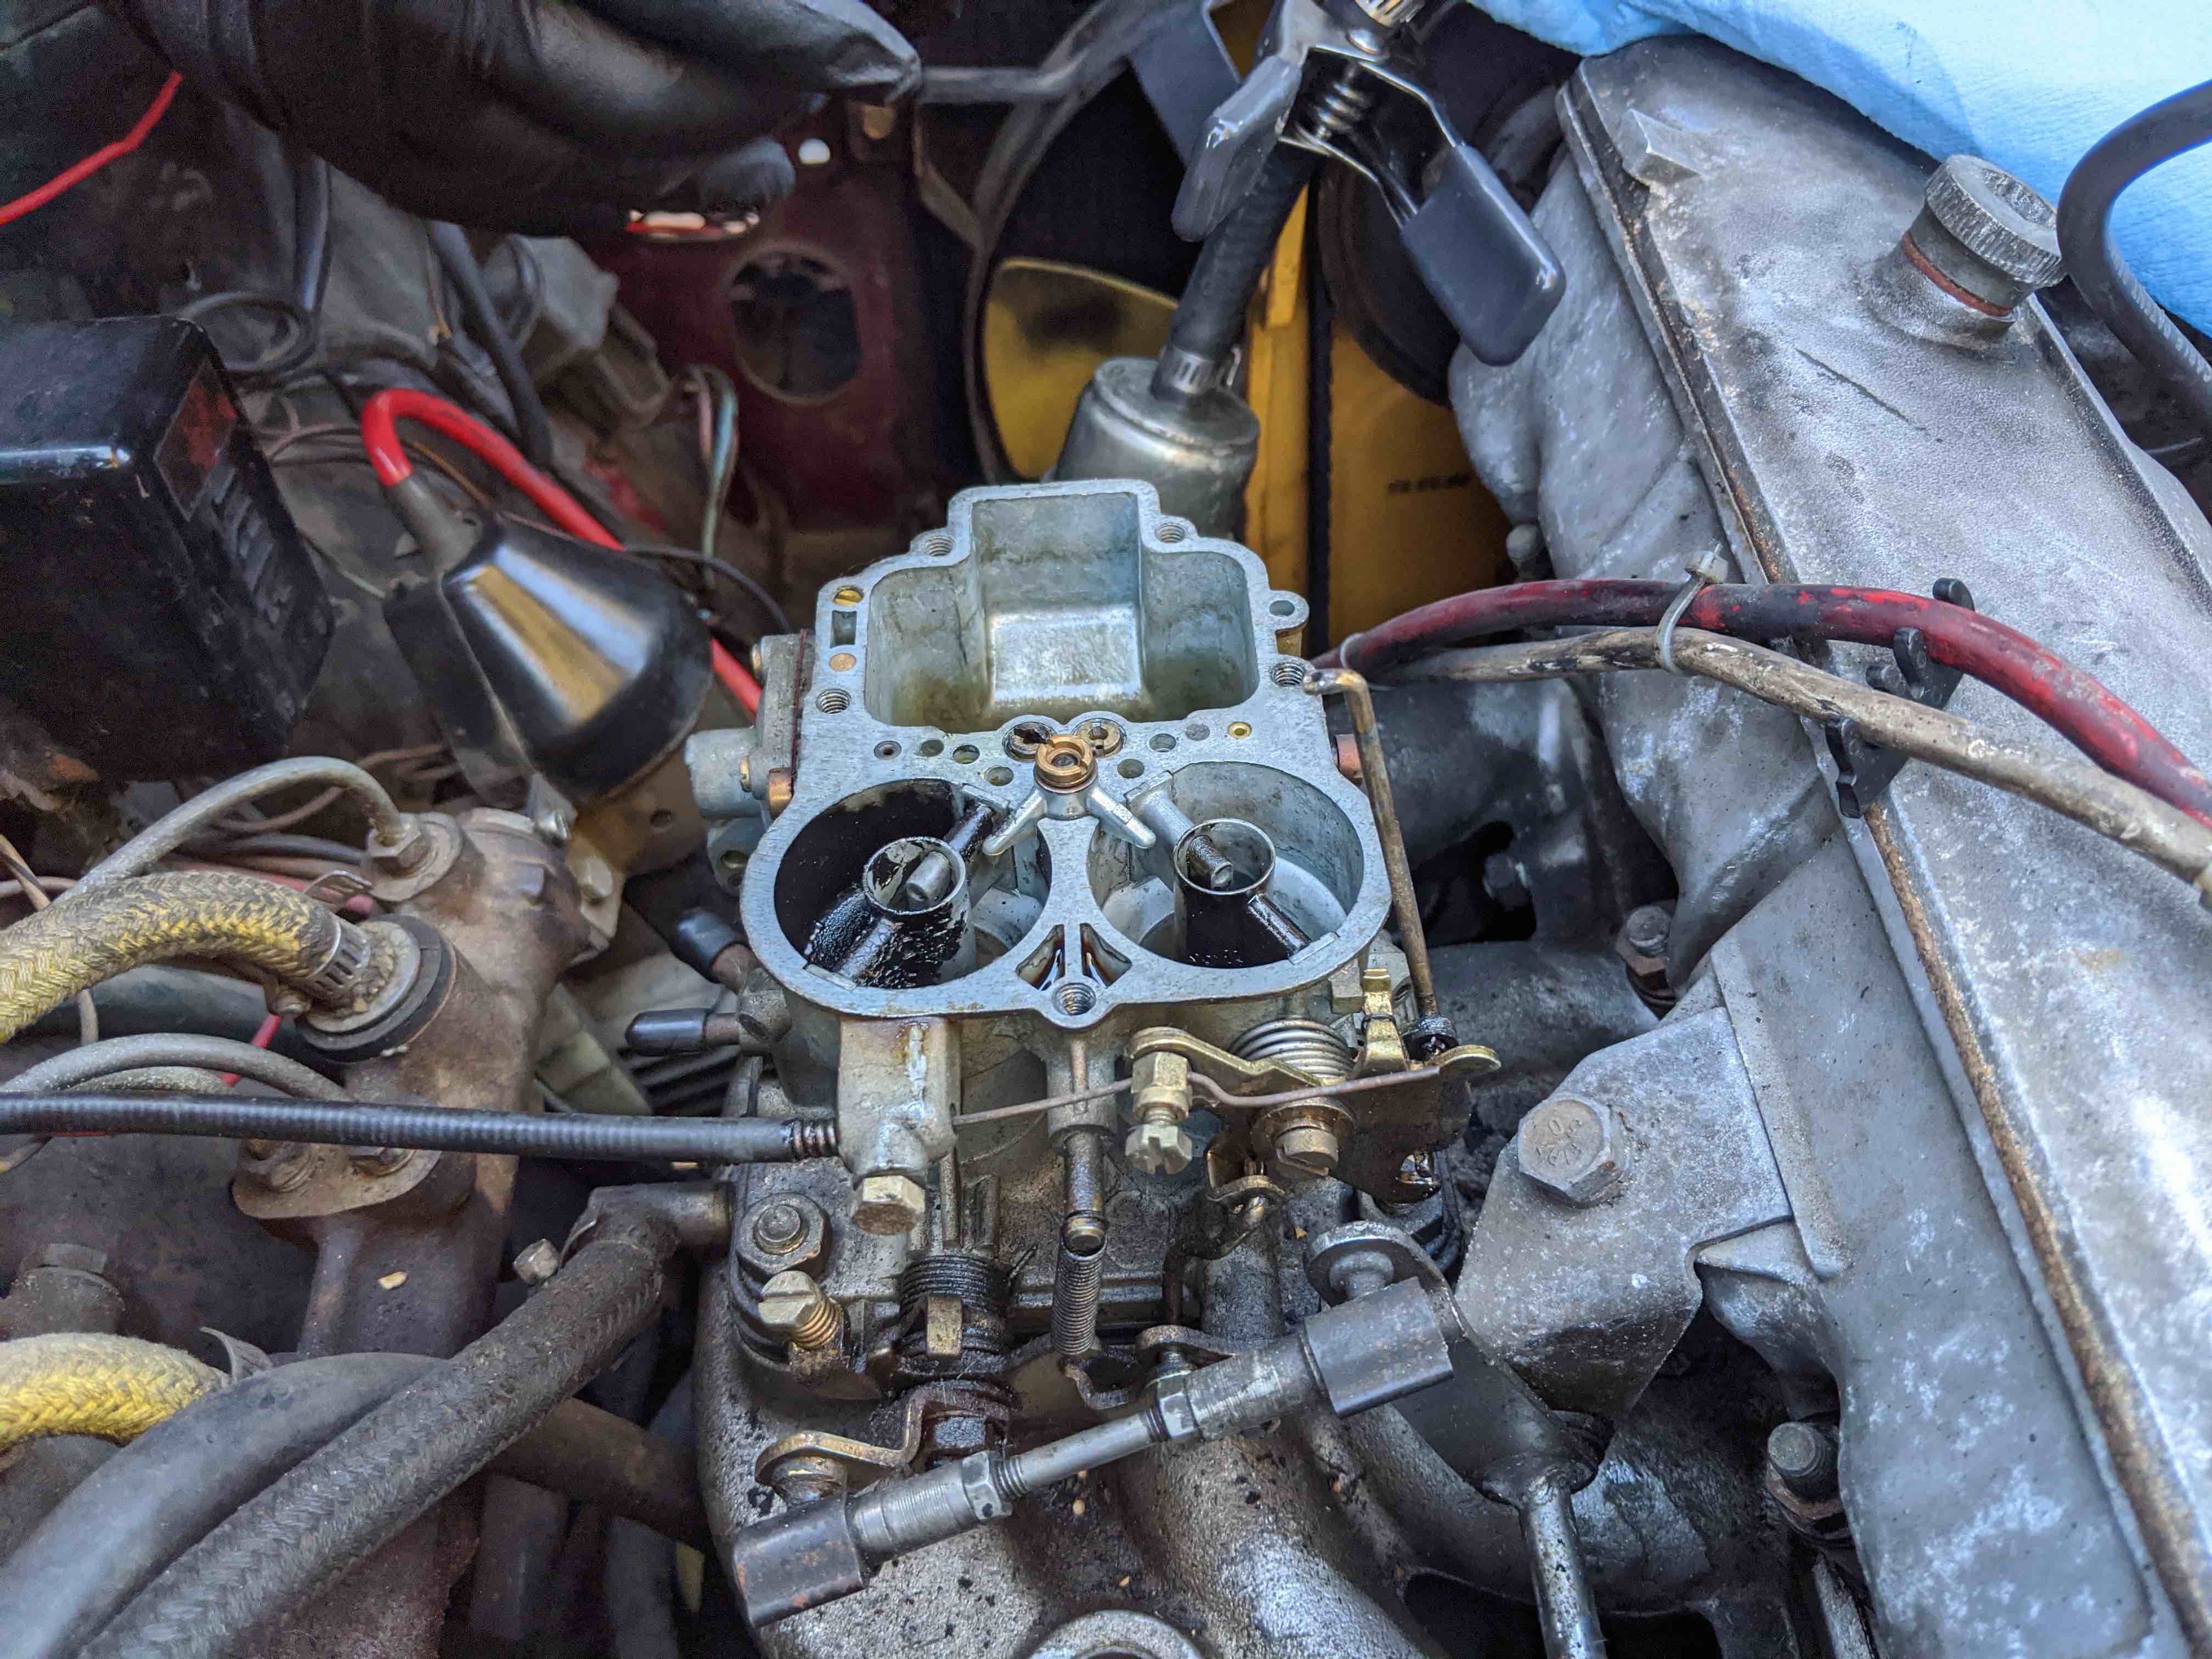
With the top of the carburetor off, I wanted to reproduce the issue that I was seeing. I knew the problem had to be in this half, since the pool with the floats was dry. When running properly, the carburetor allows fuel to be pumped into a small tank that has a float in it. As the tank fills, the floats will rise and after some point, the rising floats will cut off the flow of fuel into the tank by closing a needle valve. As fuel is depleted, the floats will lower, opening the valve and allowing more fuel into the pool.
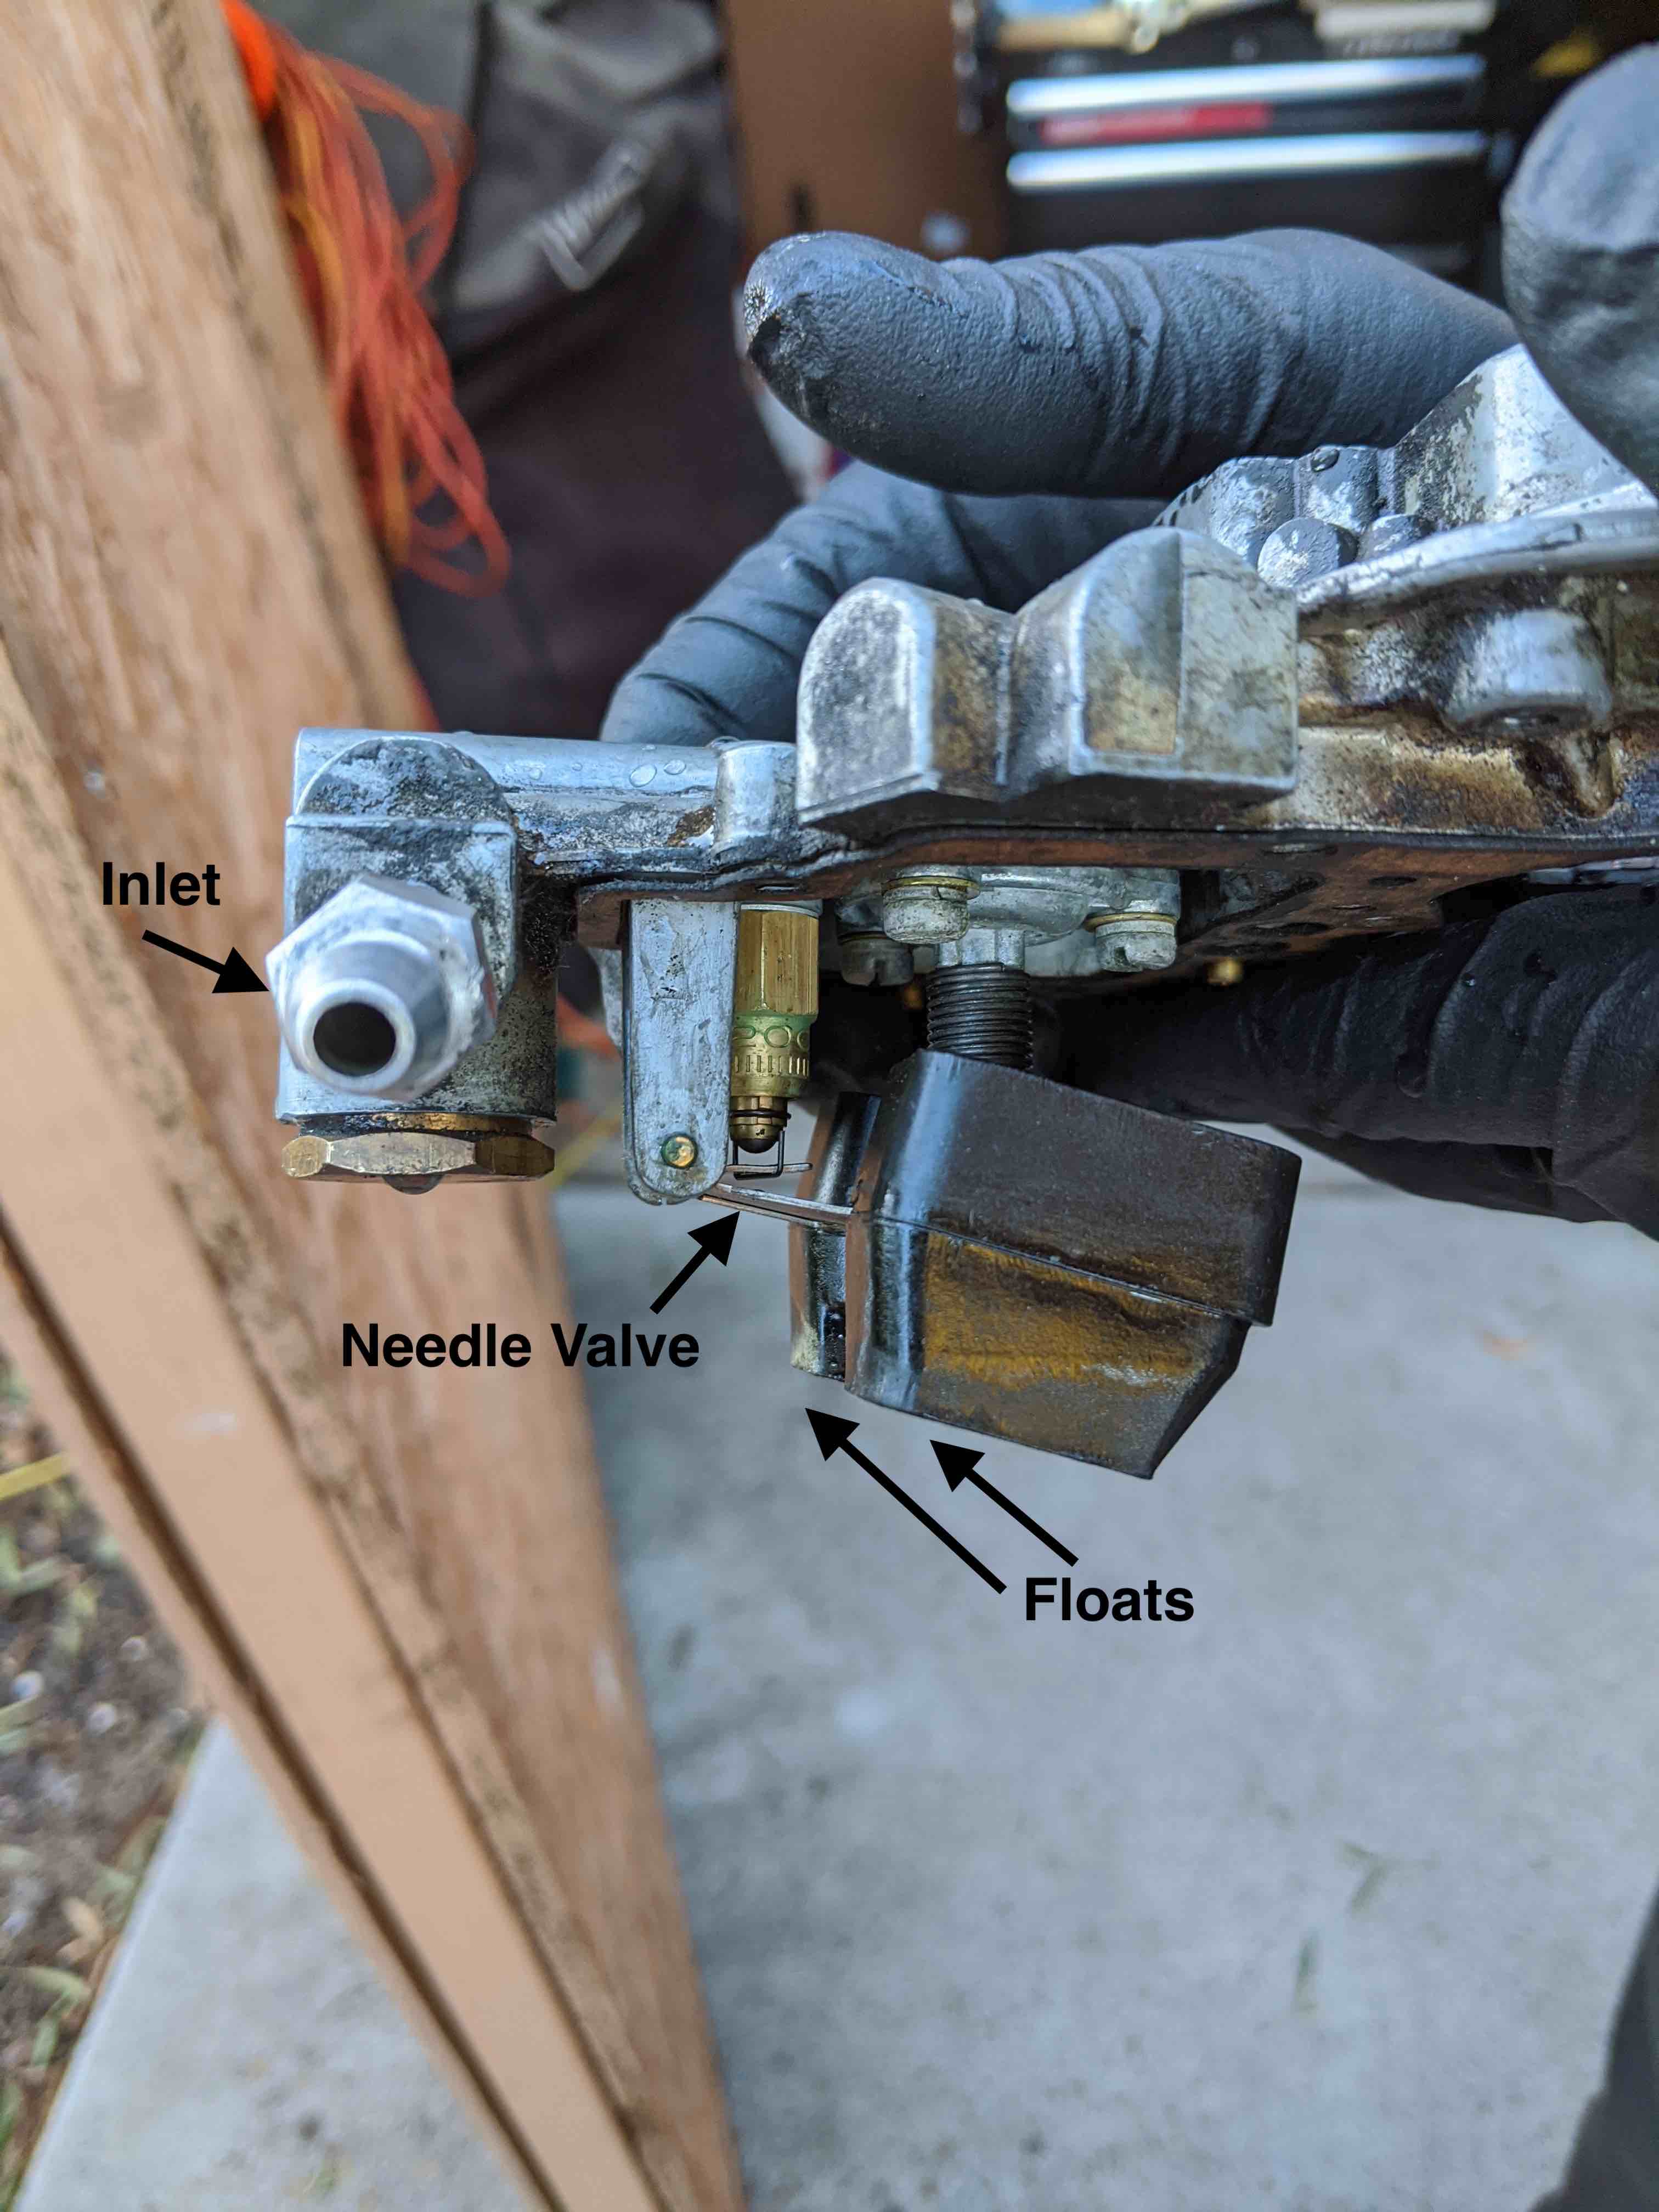
To reproduce, I connected a hose to the inlet and fed it through a handheld pump and to some distilled water. I tried to pump the water through and found that none of it was coming through the needle valve despite the floats being in their lowest position. This meant that there was some clog in between the inlet and the needle valve. We were getting close!
Taking a closer look, I found that if I moved the float up and down, the needle valve stayed in its closed position. You can see this in the image above if you look at the needle valve. The little brass valve should be resting on the little platform that's attached to the hinge of the floats.
Using some pliers, I gently pulled the needle valve down to get it unstuck. With it in the open position, I was able to pump water through the inlet just fine. However, when I moved the float, the valve would get stuck again in the closed position. Unfortunately, this made me thing that I would have to take the valve out and clean it, so that's what I did.
I first removed the floats by tapping out the pin that holds it in place. I then removed the little support wire that holds it up below the needle valve, and then was able to remove the needle valve altogether. As I expected, it was covered in residue similar to the valve in the fuel pump. I cleaned it off, and put everything back together. Once back together, the valve followed the float if I moved the float up and down. I tried pumping distilled water through it as I had before and it flowed through as expected!
We put the carburetor back on, making sure to attach the choke arm and reinstall the pin. I reattached the fuel lines and cranked the car...
It worked! The car actually ran! This was an incredibly satisfying moment for me. In context, this issue was blocking my full testing of my timing belt replacement, so having it run after weeks of getting that changed relieved a ton of stress. On top of knowing the timing belt was installed properly, this was the first time I had encountered an issue and successfully diagnosed and fixed it. Though the issue itself ended up being somewhat simple, it was a great feeling to have done by myself.
(Little did I know that the needle valve would get stuck if I let the car go for more than a week without running it and I would get very familiar with unsticking it.)
Still interested? Go back to the Project Car page and check out how other things work!